How to Capture the Northern Lights on Your Camera or Smartphone
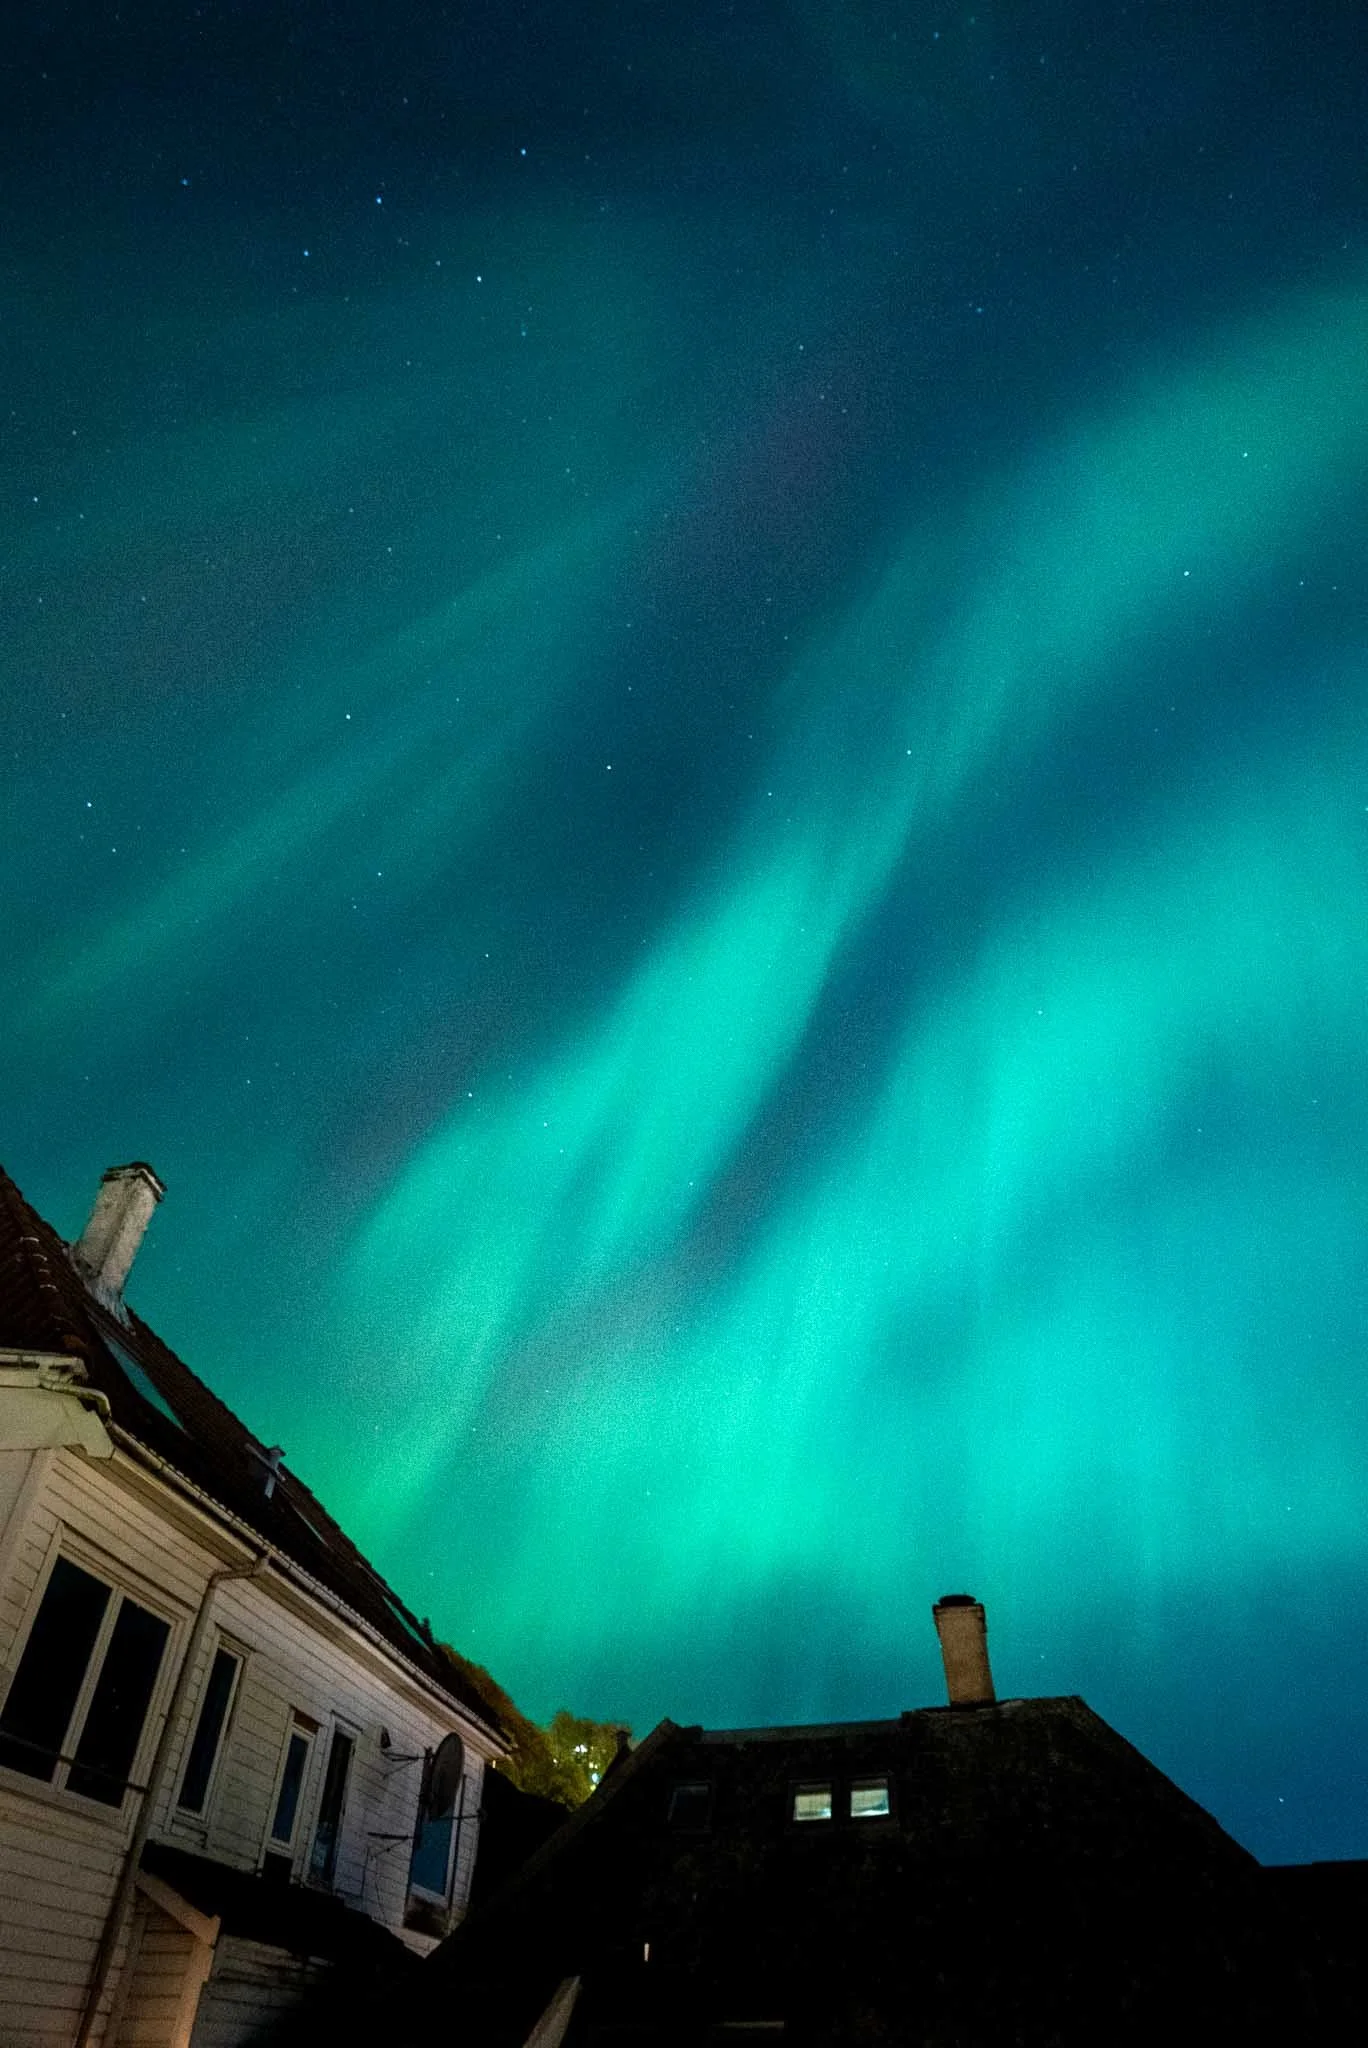
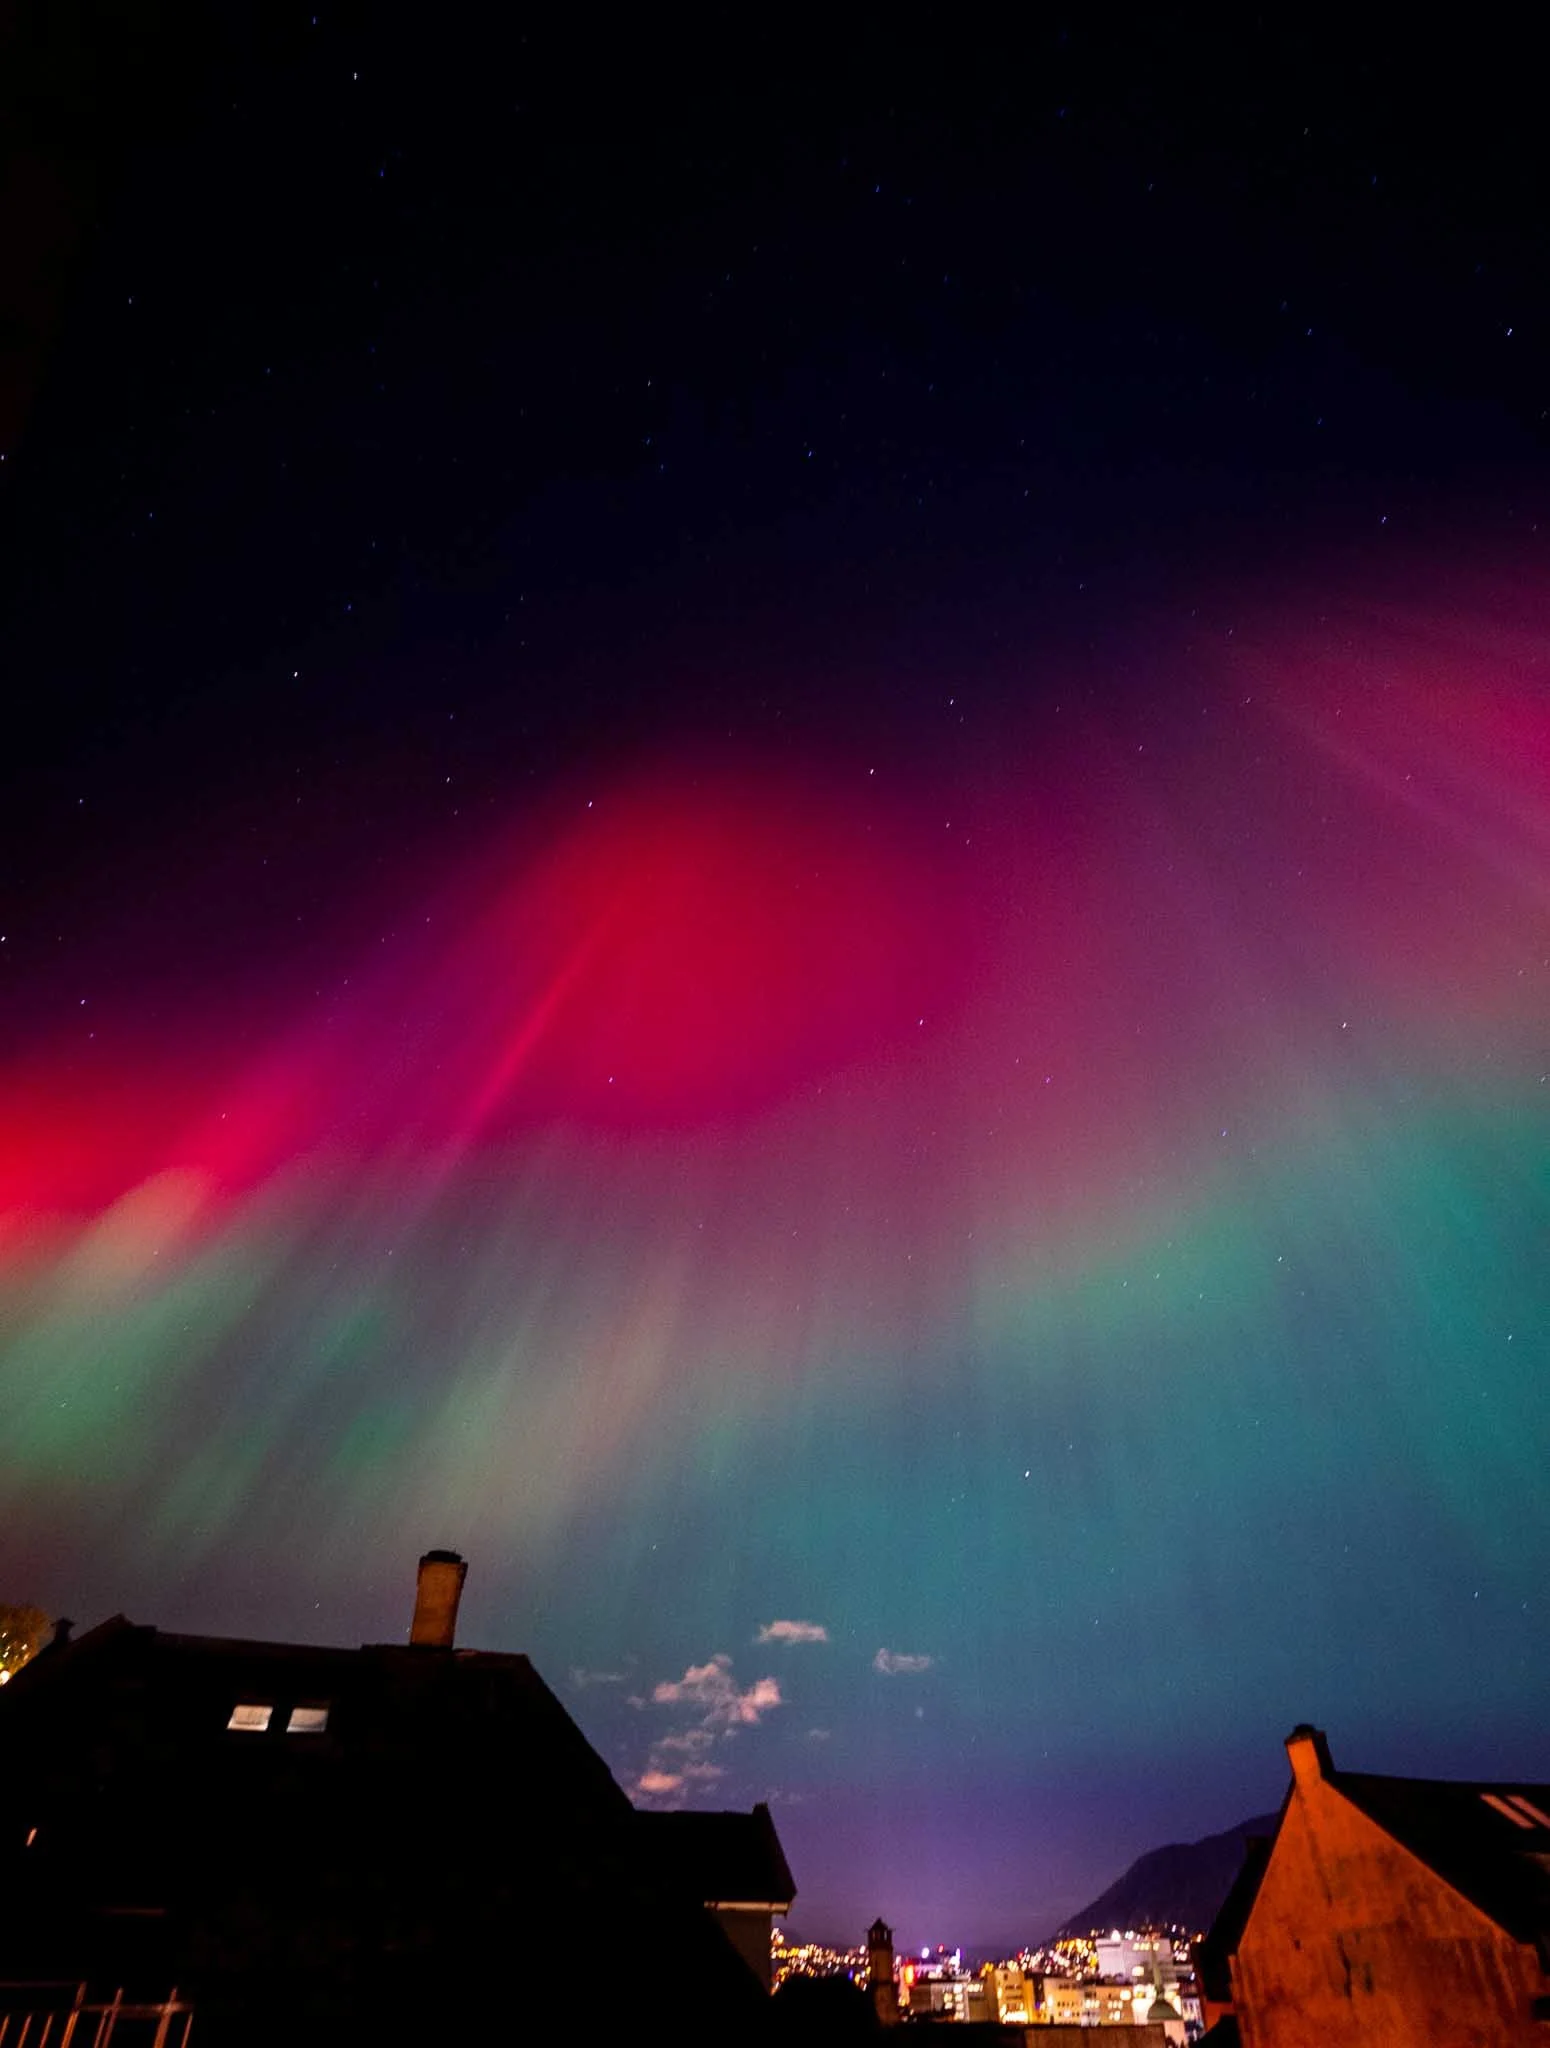
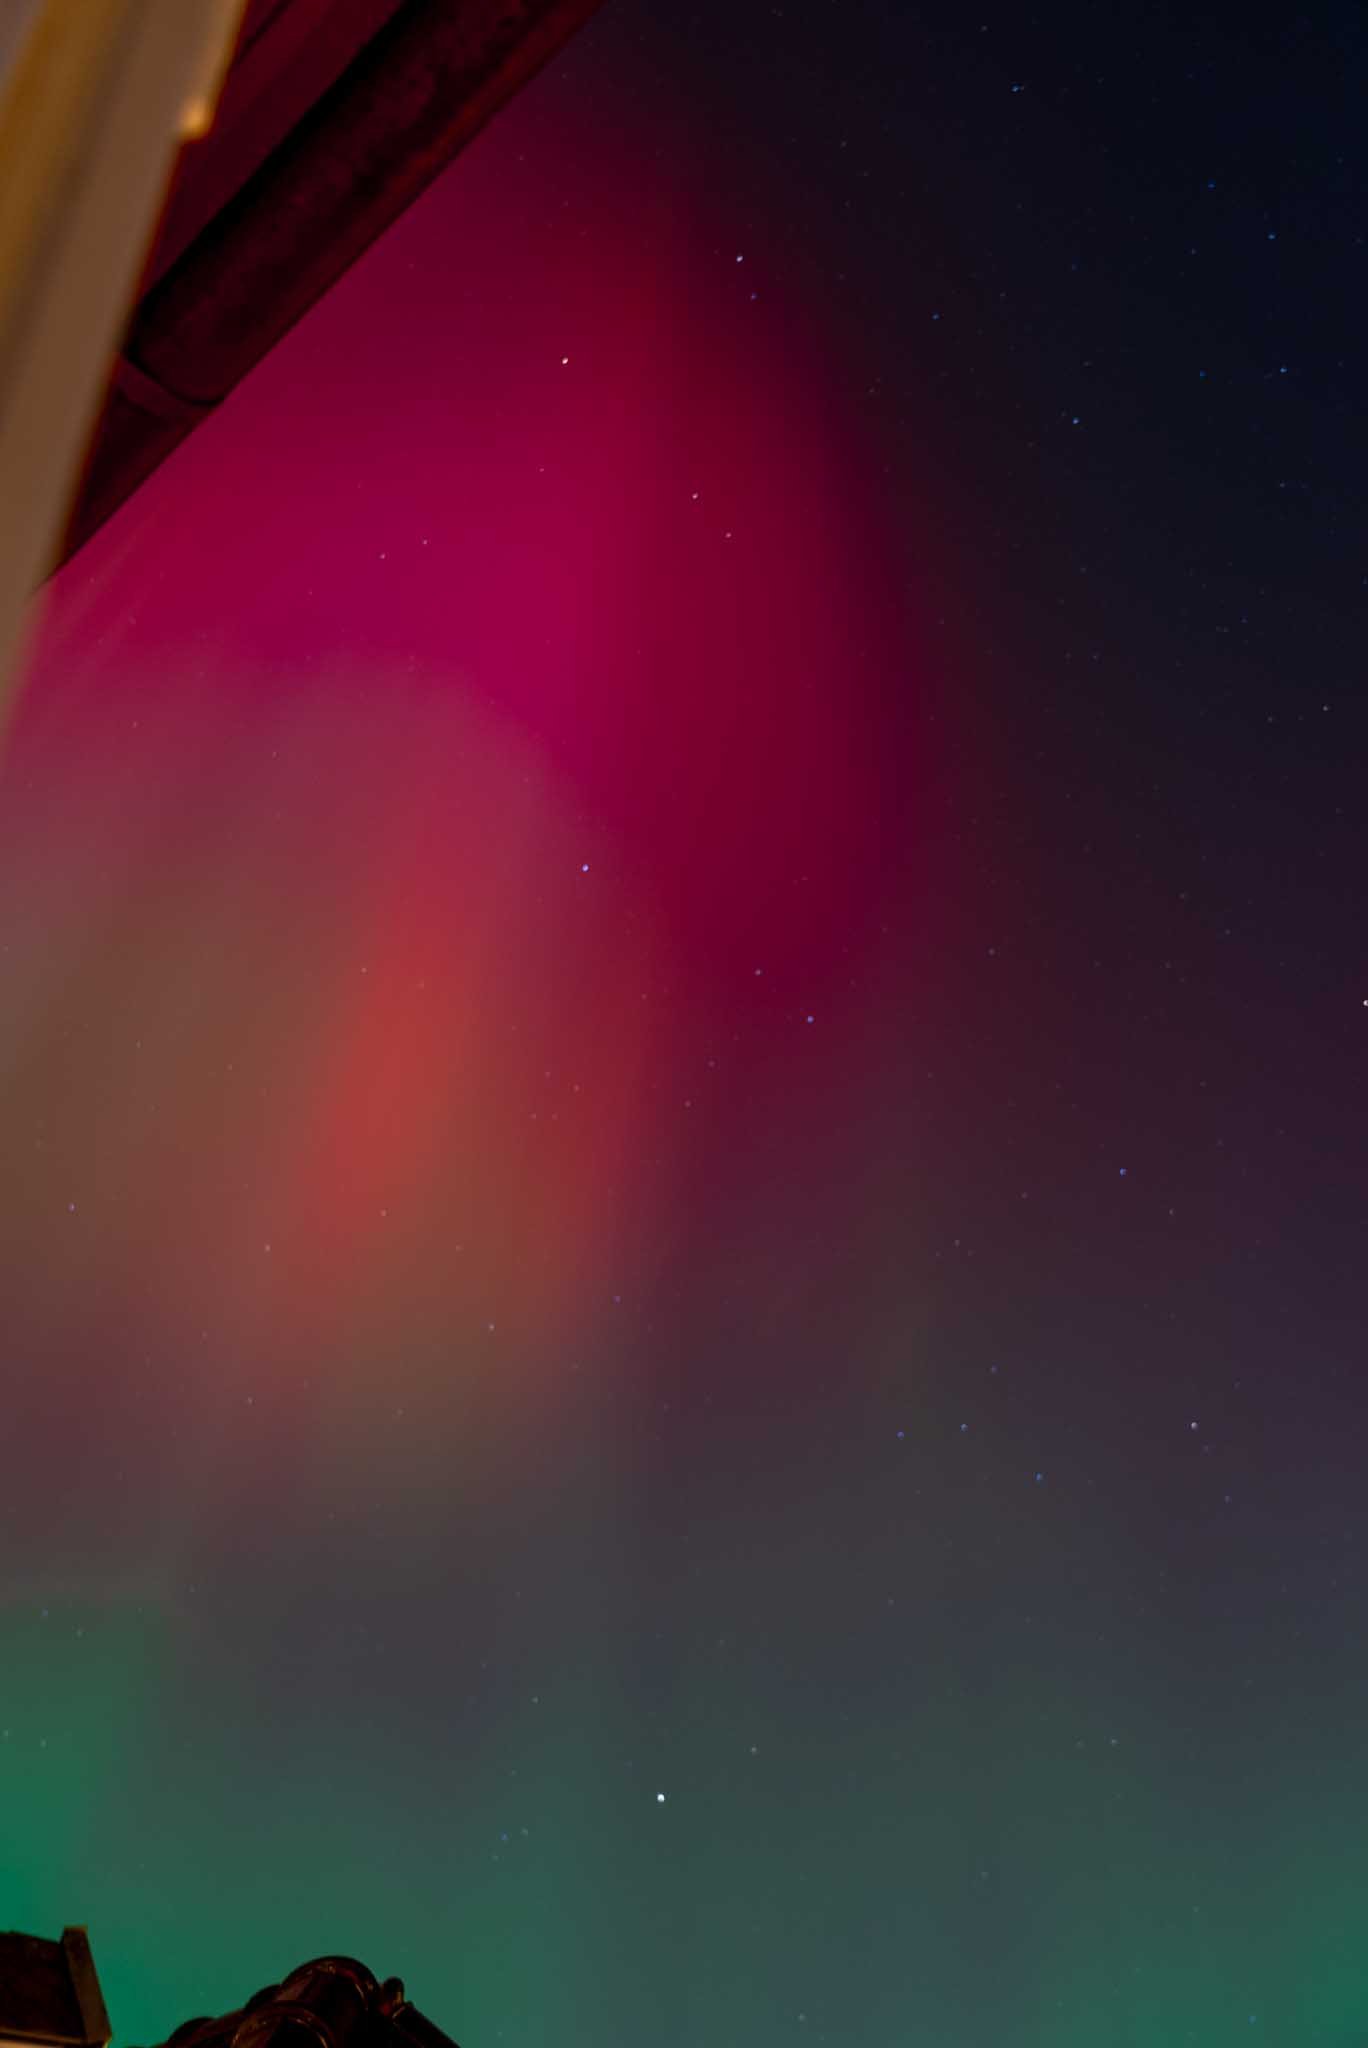
Captured with my iPhone!
A guide on how to capture the North Lights!
Let’s start with something almost everyone has - a smart phone. Now I’ll be honest, I have an iPhone so this will really go over how to use that to take photos. If you have a Samsung, please check out this blog here!
If you are using an iPhone:
Awesome - an iPhone will be able to take AMAZING photos of the Northern Lights. This is quite a few steps and this is if you want to go all out! I put them in order of importance, so even if you just do the first step here you should get some stellar photos! Here’s how to do it!
1. Turn on Night Mode (it should appear automatically)
When the scene is dark enough, the little yellow Night Mode icon pops up in the top left.
Tap it and drag the timer all the way up (or experiment with different exposure times!) usually anywhere from 3 to 10 seconds depending on how dark the sky is.
Longer exposure = better detail in the aurora.
2. Use the main (wide) lens
Not the ultrawide. Not the 2x/3x telephoto.
The main lens has the best low-light performance on every iPhone model. It gives you the cleanest greens and least noise.
3. Use a tripod or anything stable to prop your phone up
I promise I’m not trying to make you buy anything, but if I’m being honest, stability matters more than anything when you’re taking long exposure photos like this!
You can technically hand-hold it, but even tiny movements will blur the lights. Using a tripod (or a rock, railing, backpack, mitten - anything that doesn’t move) lets Night Mode actually do its job.
If you want to take it seriously, a 10 dollar mini-tripod from Amazon will instantly improve your shots. Like… noticeably.
4. Lock your focus and exposure
Press and hold on the sky until you see AE/AF LOCK. Then slide your exposure slightly down so the sky isn’t blown out. I’ll admit, we’re getting more advanced here but this will significantly improve your shots!
This keeps the phone from refocusing or brightening randomly while the aurora is moving.
5. Turn off the flash
Flash won’t help you light the sky (shocking, I know). Keep it off.
6. Shoot RAW if your iPhone supports it
If you have an iPhone 13 Pro, 14 Pro, 15 Pro, etc:
Turn on Apple ProRAW in your settings.
It gives you way more detail and flexibility when you edit afterwards.
7. Keep your ISO low
You can’t manually set ISO in the default camera app, but Night Mode helps keep it down.
If you’re using a manual app like Halide:
• Aim for ISO 800–1200 max
Higher than that gets noisy fast.
8. Take multiple shots
The Northern Lights move constantly, so take several frames:
• One long exposure (8–10 seconds)
• One short exposure (2–4 seconds)
• One super long exposure if your iPhone allows it
You’ll be surprised which one ends up being the best.
9. Keep your lens clean
Cold air + humidity = instant fog on your camera.
Wipe it often!
If you follow all of these steps you’re going to get SICK photos!
If you are using a “real camera” - not your phone:
TRIPOD, or if you’re desperate like me hold it steady to a railing or anything
Shutter speed 10-20 seconds. If they’re really bright you will be more than fine with ten seconds. I’ve even pushed it to 3 or 5 seconds!
Aperture 2.8 or somewhere near there!
ISO - go native base low so for the FX3 800 is great!
Manual focus on a star
White Balance set to daylight. Do not do shade or night time, everything will look orange.
Shoot in RAW
and maybe most importantly - remote shutter release! There is literally no point in using a long exposure if you’re going to shake up the first second of the shot… just youtube your camera and remote shutter release to learn how to manage this drive setting. A MUST! **I don’t care how steady you think you click that button - you are moving the camera :) **
* Please note that this is just one way to do it and there are a whole bunch of different scenarios in which these settings might hold you back. For example, for those of us in the arctic right now, the lights are REALLY bright. We can see these colors with our naked eye - if this is the case set your shutter speed to something around a 3!
So here’s a little more about the above, but honestly this is for keywords so I wouldn’t blame you for scrolling by!
Sam and I are lucky enough to be calling Norway home for the month of November. The northern lights, or Aurora Borealis, are one of nature’s most awe-inspiring phenomena and we’ve been fortunate enough to see them more thank half the nights we’ve been here! The vivid, dancing lights in hues of green, purple, and pink are caused by solar particles colliding with the Earth's atmosphere, creating a stunning light show. 2026 is shaping up to be a particularly good year for seeing the northern lights, thanks to heightened solar activity during the current solar cycle, making it one of the most favorable periods in recent history. If you're planning to witness this celestial wonder, it's essential to know how to capture it with your camera or smartphone. Here's a step-by-step guide to help you get the best results, whether you're using a “real camera” or your phone.
Why 2026 is the Perfect Year to See the Northern Lights
The frequency and intensity of the northern lights are directly related to solar activity, specifically solar storms, which occur during a period called the solar maximum. This period is part of an 11-year solar cycle, and we are now in the most active phase. This means stronger solar flares and more frequent northern lights displays, visible even further south than usual. Northern areas like Alaska, Canada, and Scandinavia will enjoy more frequent and vibrant displays, and those who live in slightly lower latitudes, such as parts of the Northern U.S. and Europe, will have a rare chance to witness them.
Given these conditions, capturing the northern lights with your camera has never been more timely. Whether you're an experienced photographer or a casual stargazer with just a smartphone, now is the time to learn how to capture this phenomenon.

I thought this was a pretty cool breakdown of what exactly I'm seeing and why. While in Norway we've been able to see all these colors with just our eyes, not though our camera lens - which is pretty epic!
Capturing the Northern Lights with a DSLR or Mirrorless Camera
Using a DSLR or mirrorless camera offers the most flexibility and control when shooting the northern lights. With a few key adjustments to your settings and some practice, you’ll be able to capture stunning images of the Aurora Borealis.
1. The Right Gear
Camera: Any DSLR or mirrorless camera with manual mode will work. A full-frame sensor is ideal for low-light conditions, but an APS-C camera will also yield good results.
Lens: Use a wide-angle lens (14-24mm) with a fast aperture (f/2.8 or lower) to capture as much of the sky as possible. The faster the lens, the better it will perform in low light.
Tripod: A sturdy tripod is non-negotiable. To capture the northern lights, you’ll need to keep your camera as steady as possible for long exposures.
Remote Shutter Release: Using a remote or setting a delay timer on your camera will prevent camera shake and ensure sharp images.
2. Manual Settings
Focus: Set your lens to manual focus and focus on infinity. To ensure the sharpest results, you can zoom in on a distant light or star and adjust until it’s pin-sharp.
ISO: Set your ISO between 800 and 3200, depending on the brightness of the northern lights. A higher ISO captures more light, but too high can introduce noise.
Aperture: Open your aperture as wide as possible (f/2.8 or lower). A wide aperture lets in more light and captures the vibrancy of the Aurora.
Shutter Speed: Start with a shutter speed of 10-20 seconds. Shorter exposures will capture sharper details in the northern lights, while longer exposures may create motion blur if the lights are moving fast.
White Balance: Set your white balance to daylight or auto. You can adjust this in post-processing if needed.
Shoot in RAW: Always shoot in RAW format. RAW files preserve the most detail and give you the flexibility to make significant adjustments in post-processing without losing quality.
3. Framing and Composition
Foreground Elements: Including a foreground element (mountains, trees, or a cabin) can add depth and context to your northern lights shot. However, make sure the focus remains on the sky.
Check the Forecast: Northern lights apps like My Aurora Forecast can predict aurora activity and visibility in your location. Timing is crucial, as even a bright moon can wash out the lights, so aim for a dark, clear night.
Experiment: Don’t be afraid to experiment with your settings. I have taken a bunch of photos with a whole different bunch of settings and honestly they’ve all given me some cool results. The settings I’ve described above are a near guarantee to get you great shots but that doesn’t mean you can’t try a different way! If you have some great results with something else - let me know what worked for you! Depending on the intensity of the aurora, you might need to tweak your shutter speed or ISO for the best results.
Frequently Asked Questions: Capturing the Northern Lights
Q: What camera settings should I use to photograph the Northern Lights?
A: Start with a tripod, use a shutter speed between 10–20 seconds, aperture around f/2.8, and ISO 800. Focus manually on a star, set white balance to daylight, and always shoot in RAW for the best flexibility in editing.
Q: Can I capture the Northern Lights with my smartphone?
A: Absolutely! Use night mode or long exposure mode, stabilize your phone on a tripod, and keep it as still as possible. The newer your smartphone, the better its low-light performance will be.
Q: What’s the best time to see the Northern Lights?
A: The Northern Lights are most visible during solar maximum cycles, like we’re experiencing in 2024–2026. For the best chance, head north between late September and early April, on clear, dark nights away from city lights.
Q: Do I need special equipment to capture the Northern Lights?
A: You don’t need a fancy setup! A camera with manual mode and a wide, fast lens (like 14–24mm f/2.8) is ideal, but even smartphones can do a great job with the right stability and timing.
Q: Can an iPhone really take good photos of the Northern Lights?
Yes — iPhones are actually amazing at capturing the Northern Lights. Night Mode, long exposures, and the main wide lens work together to pull in way more color and detail than most people expect. As long as the aurora is visible to your eyes, your iPhone can photograph it.
Q: Do I need a tripod to photograph the Northern Lights on my iPhone?
If you want crisp, sharp photos of the Northern Lights, a tripod (or anything stable) makes a huge difference. Long exposures are sensitive to the tiniest movements. Even pro photographers use tripods for aurora photography — it’s the easiest way to upgrade your shots instantly.
Q: What Night Mode settings should I use for the Northern Lights?
For Northern Lights photography, set Night Mode to anywhere between 3 and 10 seconds.
• Use shorter times for bright, fast-moving auroras.
• Use longer times for faint or slow-moving ones.
Night Mode is your biggest tool for capturing strong aurora color and texture.
Q: Should I shoot the Northern Lights in RAW on my iPhone?
If your iPhone supports Apple ProRAW, definitely turn it on for Northern Lights photos. RAW gives you far more detail in the greens, purples, and stars, and it allows for cleaner editing afterward.
Q: Why shouldn’t I use the ultrawide lens for Northern Lights photos?
The ultrawide lens struggles in low light, so your Northern Lights images will look grainy, mushy, or soft. The main wide lens is much brighter and sharper, which is exactly what you need for nighttime aurora photography.
Q: Do I need a special app to shoot Northern Lights photos on my iPhone?
No — the built-in Camera app works great for Northern Lights photos. A manual app like Halide can help with ISO control or precise focusing, but most people get amazing aurora shots using only Night Mode.
Q: Why does my iPhone battery drain so fast when photographing the Northern Lights?
Cold temperatures are brutal on phone batteries — especially during long exposures. When shooting the Northern Lights, keep your iPhone in an inside pocket or wrapped in a glove between shots to keep it warm.
Q: Should I zoom in when taking photos of the Northern Lights?
Avoid zooming on your iPhone when capturing the Northern Lights. Digital zoom reduces quality and makes the aurora look soft. It’s always better to crop later if you want a tighter composition.
Q: Why do my Northern Lights photos look blurry?
Blurry Northern Lights photos usually come from:
• hand movement during long exposures
• the lens fogging up in cold air
• the phone changing focus mid-shot
Using Night Mode, locking focus, stabilizing your phone, and wiping the lens often will fix most of these issues.
Q: Can I record video of the Northern Lights on my iPhone?
You can, but recording Northern Lights videos on an iPhone is much harder than taking photos. Video needs more light, so the footage may look grainy unless the aurora is bright and active. Photos will almost always look better, but you can get usable video in the right conditions.
Conclusion
Capturing the northern lights can be a magical and rewarding experience, whether you’re using a high-end DSLR or your trusty smartphone. The key is understanding the right settings and techniques to make the most of the equipment you have. With the current solar maximum promising exceptional auroras in 2026, this is the perfect time to plan your northern lights photography adventure. Remember to stay patient, experiment with your settings, and most importantly enjoy the breathtaking show above.